Best Way to Build a Root Cellar at Home
Root cellars have been used to store food for centuries. They’re typically underground or partially underground cavernous cellars, where fruits, vegetables, nuts, seeds, legumes, and gourds can be kept safe from heat and light and stored for days or even months at a time. Root cellars are nothing new, but with more people interested in natural ways to preserve foods, they’re making a comeback.
Root cellars can take different forms, some of which are relatively easy to build. These tips will get you on your way to storing your homegrown produce in no time.
Root cellar basics
Regardless of which type of root cellar you add to your home, these key elements will determine your success: temperature, humidity, ventilation, and darkness.
Temperature
To work properly, a root cellar should stay between 32 and 40 degrees Fahrenheit. Harmful bacteria thrive in the warmth, so keeping your cellar cool helps crops stay fresh and safe for longer. A good root cellar is designed to borrow cold from the cool ground or soil, but it will also not freeze your produce in winter weather.
Humidity
Humidity levels inside your cellar should be between 85 and 95% to prevent the cellar from losing moisture through evaporation and to keep produce from withering. If your cellar is above ground, you can achieve the right humidity level by simply having a dirt floor, since soil naturally has a good amount of moisture. If your cellar is below ground, you shouldn’t have to take special measures to maintain the proper humidity. However, if you do need more moisture, you can spread damp—not wet—burlap bags over your produce, or pack your produce in damp moss, sand, or even sawdust.
TIP: Equip your root cellar with a hygrometer and thermometer to track humidity and temperature. Check both daily.
Ventilation
Since warm air rises, you’ll need to ensure proper ventilation to prevent moisture build-up, which can lead to moldy produce. Make sure your cellar has both an air intake and exhaust vents to keep the air circulating. The incoming air vent should be low to the ground and the outlet vent should be higher, close to the ceiling. For best results, the two should be on opposite sides of your cellar space. This will let cool, fresh air in from outside and allow stale air to be exhausted out.
Darkness
Light can cause freshly picked crops to continue sprouting. So, you’ll want to keep the cellar as dim as possible. This means covering up windows that let sunlight in and ensuring cellar lights are off when no one’s inside.
Basement root cellar: Ideal for warmer climates
This option provides the convenience of having your fruits, veggies, and other bounty easily accessible within your home’s basement. Having a packed earth or gravel floor is best, however a concrete basement floor can also work.
Step 1:
Choose a dark, cool, dry corner of your basement as your root cellar space. Select an area with a window for ventilation.
Step 2:
Cover the window with exterior-grade plywood to block the sunlight. Use your drill and screws to secure the wood in place.
Step 3:
Put on safety glasses and cut vent holes through the plywood using a multi-tool. A 4-inch intake vent and 4-inch exhaust vent should be adequate for an 8-by-10-foot room. If your space is larger, consider adding additional vents.
Step 4:
Cover vent holes with mesh screen and tack to keep critters out of your cellar.
Step 5:
Place wood shelving 3 inches away from the walls so that air can circulate. Using wood shelves will keep temperatures more consistent, and they’ll stay cooler than metal shelves.
Step 6:
Add wood crates or bushel baskets on shelves to house your produce. Separate foods by type to stay organized.
Step 7:
Add your produce in each crate or basket. Add one layer of food, then one layer of straw. Keep layering to the top. This method will help prevent fruits and vegetables from resting against each other, which can cause rotting.
Trash can root cellar: Ideal for cooler climates
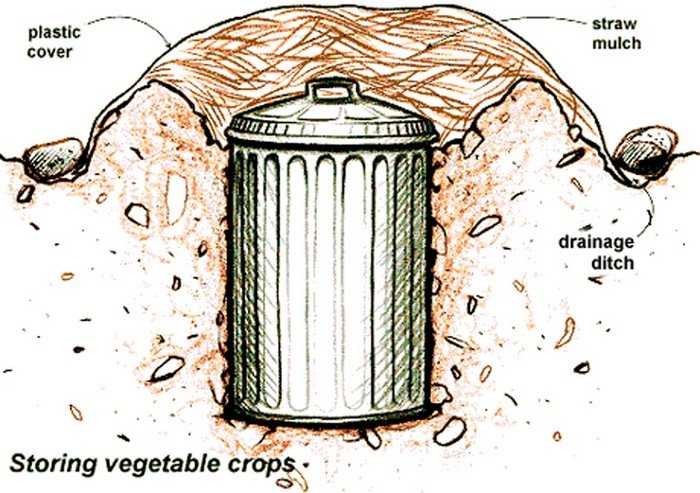
This method involves a bit of digging. A trash can root cellar uses the soil’s naturally cool, moist conditions to create the environment of a refrigerated produce bin.
Materials needed for a trash can root cellar:
Round point shovel
20-gallon galvanized steel trash can and lid
Drill with 3/8-inch drill bit
Chopped straw
Gravel
Waterproof tarp
Cinder block
Step 1:
Pick your spot. If your region gets snow, choose a sheltered location so you don’t have to dig to reach your produce. Beneath a porch and inside a dirt-floor shed are great options.
Step 2:
Dig a deep hole with your round point shovel large enough to insert a 20-gallon galvanized steel trash can, leaving 4 inches of the can above the soil line.
Step 3:
Line the floor of the dirt hole with gravel to drain rainwater away from the can.
Step 4:
Drill ventilation holes all around the bottom of the can, roughly 6 to 12 inches apart from each other.
Step 5:
Fill the can with produce, layering in straw, and cover it with the galvanized steel lid.
Step 6:
Pile 12 inches of straw on top of the closed lid.
Step 7:
Cover the cellar with a waterproof tarp to keep the straw in place and to stop rain from seeping into the can.
Step 8:
Top with a cinder block to hold the tarp down and keep foraging wildlife out.
Ready to build a root cellar of your own? Let’s hear about it in the comments below!


